


Tutorial
Back to Tutorials
Using the File Drop widget
Discover what can be done with the FIle Drop widget
Take a look at what's in the latest Frog Release - Discover Hopper
UPDATED - 15/12/17
Display more...
The File Drop was designed for teachers to be able to collect work from students quickly and easily. Many schools are also using it as a way to display lists of files without too much effort, but the File Drop and more specifically its API offer so much more capability.
You can use it to create a slideshow, video gallery and pretty much anything else.
Outcomes
By the end of this tutorial, you should be able to:
- Use the HTML widget to access a File Drop's API
- Use that API to create a Carousel gallery on a page
- Use that API to create a video gallery
- Use the API to display SIMS cover webpages
And with that, let's get started...
File Drop API
This tutorial isn't going to go in-depth about working with APIs. That's for a future tutorial. Instead, to keep this one simple and not take too much time, I'm going to supply you with the code and instructions on how to implement it.
Step 1
Drag a File Drop onto a page and add some files to it. Make sure the view settings are Group and not individual.
Step 2
Set the View settings to Group. Once all set up, you're probably also going to want to add a Rule to the widget hiding it from everyone, so we only see the HTML version, but I'll leave that to you to decide.
Step 3
Drag in an HTML widget and paste in the following code:
<ul id="filelist"></ul>

<script type="text/javascript">

var baseURL = Frog.Utilities.getBaseUrl(),
    // Change fileDropUuid to the UUID of your file drop widget
    fileDropUuid = '72C35B492002821AF1922FA01D6943066824AD8CD860E3AD';
Frog.Model
    .api('filedrop.get', {
        filedrop: fileDropUuid
    }).done(function(filesResponse) {
        var $fileList = $('#filelist'),
            $slideShowCount = $("#filedrop-slide-show-count"),
            $slideShowImageContainer = $("#filedrop-slide-show-img"),
            fileCount = 0;
        filesResponse.data.resources.forEach(function(file, index) {


                    $fileList.append(
                        $('<li>').text(file.file.name)
                    );


        });
    });
</script>
Step 4
We need to determine the UUID (the unique identifier) of the FileDrop in order to run its API. To do this:
- Leave edit mode
- Right-click on the FileDrop and choose Inspect
- In the Developer Tools, Elements section, move your mouse pointer up through the code until in the browser the entire widget is highlighted blue
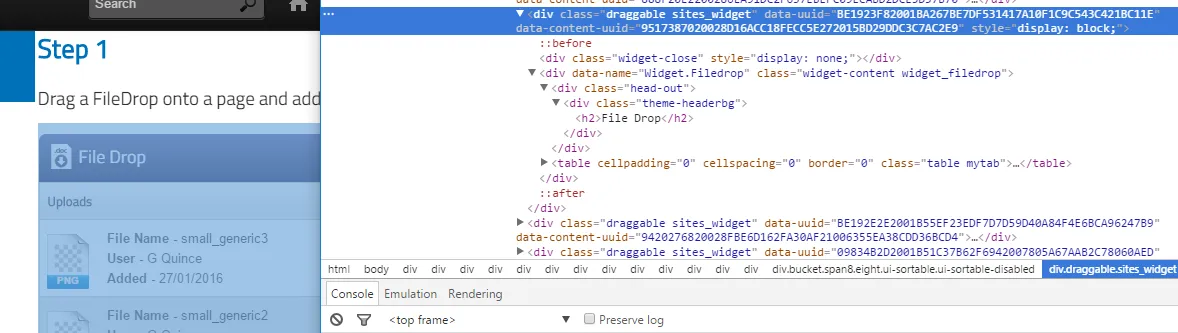
The UUID is listed in the section:
data-content-uuid="9517387020028D16ACC18FECC5E272015BD29DDC3C7AC2E9"
Step 5
Double-click on the UUID to isolate this and copy. Open your editor and paste this UUID into the section of the code:
fileDropUuid = '9517387020028D16ACC18FECC5E272015BD29DDC3C7AC2E9';
If you need to see this in action, Simon Nicholas from Ralph Allen School has prepared this YouTube tutorial...
The code above should produce a list of the file names for the files:

So, using this powerful API, we can also access information such as the URL of the files and their extensions, and that means we can start building some really useful resources.
Slide show
Frog utlises most of Bootstrap CSS (there's a few missing bits, due to naming conflicts. This means that we can quickly and easily use Bootstrap's Carousel with our File Drop widget. In place of the individual listing for each image, we can use the File Drop API to populate the list for us.
<style>
.carousel-fade .carousel-inner .item {
    opacity: 0;
    -webkit-transition-property: opacity;
    -moz-transition-property: opacity;
    -o-transition-property: opacity;
    transition-property: opacity;
}
.carousel-fade .carousel-inner .active {
    opacity: 1;
}
.carousel-fade .carousel-inner .active.left,
.carousel-fade .carousel-inner .active.right {
    left: 0;
    opacity: 0;
    z-index: 1;
}
.carousel-fade .carousel-inner .next.left,
.carousel-fade .carousel-inner .prev.right {
    opacity: 1;
}
.carousel-fade .carousel-control {
    z-index: 2;
}
.carousel-inner img {
    margin-left: auto;
    margin-right: auto;
}
.department_images {
    width: auto;
    height: 360px;
}


.carousel-arrow-left,
.carousel-arrow-right {
    top: 50%;
    border: solid transparent;
    content: " ";
    height: 0;
    width: 0;
    position: absolute;
    pointer-events: none;
    border-width: 15px;
    margin-top: -15px;
}
.carousel-arrow-right {
    left: 35%;
    border-left-color: #FFFFFF;
}
.carousel-arrow-left {
    right: 35%;
    border-right-color: #FFFFFF;
}
</style>
<div id="Carousel_ID" class="carousel slide carousel-fade col-lg-8 col-offset-2">
    <ol id="filedrop-slide-show-count_ID" class="carousel-indicators">
    </ol>
    <div id="filedrop-slide-show-img_ID" role="listbox" class="carousel-inner">
    </div>
    <!-- Left and right controls -->
    <a class="left carousel-control" href="#Carousel_ID" data-slide="prev">
        <span class="carousel-arrow-left"></span>
    </a>
    <a class="right carousel-control" href="#Carousel_ID" data-slide="next">
        <span class="carousel-arrow-right"></span>
    </a>
</div>

<script type="text/javascript">

var baseURL = Frog.Utilities.getBaseUrl(),
    // Change fileDropUuid to the UUID of your file drop widget
    fileDropUuid_ID = '405FA7B9200288C5F9C48F0DBDF39E050EA9502CCF1A395D',
    id = Frog.Utilities.generateSimpleId(),
    data,
    self = this;

    this.element.find('[id*=ID]').each(function(idx, el) {
        var $el = $(el);

        $el.attr('id', $el.attr('id').replace('ID', id));
    });
	this.element.find('[href*=ID]').each(function(idx, el) {
        var $el = $(el);
        $el.attr('href', $el.attr('href').replace('ID', id));
    });
Frog.Model
    .api('filedrop.get', {
        filedrop: fileDropUuid_ID
    }).fail(function() {
	/* Display a broken image, rather than cause the carousel to break */
    data = {"resources":[{"file":{"uuid":"1234","name":"FrogHead","ext":"JPG"}}]};
})
.done(function(resp) {
    data = resp.data;
})
    .always(function(filesResponse) {
        self.element.find('.carousel').carousel();
        var $fileList_ID = $('#filelist_'+id),
            $slideShowCount_ID = $("#filedrop-slide-show-count_"+id),
            $slideShowImageContainer_ID = $("#filedrop-slide-show-img_"+id),
            fileCount_ID = 0;
        data.resources.forEach(function(file, index) {
            // Check whether the file is one of these filetypes; Want to add more? Add to the array
            if (['jpg', 'jpeg', 'gif', 'png'].indexOf(file.file.ext.toLowerCase()) > -1) {
            //alert(file.file.uuid);
                $slideShowCount_ID
                    .append(
                        $('<li>')
                        .attr('data-target', 'Carousel')
                        .attr('data-slide-to', fileCount_ID)
                        .addClass(function() {
                            if (fileCount_ID === 0) {
                                return 'active';
                            }
                        })
                    );
                $slideShowImageContainer_ID
                    .append(
                        $('<div>').addClass('item')
                        .addClass(function() {
                            if (fileCount_ID === 0) {
                                return 'active';
                            }
                        })
                        .append(
                            $('<img />').addClass('img-responsive').addClass('department_images')
                            /* ?width=400&height=500 this addition creates a new image on your Frog server at 400 pixels wide by 500 pixels high.  This prevents the gallery from serving much larger pictures than required - which can cause your Frog to slow down */
                            .attr('src', baseURL + '/app/file/resource/' + file.file.uuid + '?width=400&height=500')
                            .attr('align', 'center')
                        )
                    );
                fileCount_ID++;
            }
        });
    });
</script>
Paste the code above into an HTML widget (setting the UUID to your File Drop's UUID) and it should do the work for you. The style tags at the top are because of Graham Quince's personal preference. The images fade from one to another rather than slide.
The class tags .carousel-arrow-left and .carousel-arrow-right (line 32 onwards) are because the graphicons for left and right arrows in Bootstrap are missing in Frog's version.
Note the IF statement on line 82. That only adds images to the carousel code. If you happen to add other file types that aren't jpg, gif or png files, they won't display. Hopefully you can see that to adapt this to add another image, it is as easy as knowing the file extension.
That's quite a complicated first example, so the next example is a bit easier. Let's use basic HTML5 to display videos to quickly make a video gallery.
Video Gallery
The Media widget is a great, quick way to add video to a page, but what if you want to add dozens of videos. Using the File Drop widget and the HTML widget, we can quickly set out a page of videos - and add and remove them easily.
There are limitations with embedding videos in a browser. Frog currently does not stream video, so the files download first.
Set up your page with the HTML widget and File Drop widget and use this code:
<div id="videoList"></div>

<script type="text/javascript">

var baseURL = Frog.Utilities.getBaseUrl(),
    // Change fileDropUuid to the UUID of your file drop widget
    fileDropUuid = '356B0435200283A6F783CF3A0D4093089CAB1C2C7D608559';
Frog.Model
    .api('filedrop.get', {
        filedrop: fileDropUuid
    }).done(function(filesResponse) {
        var $fileList = $('#videoList');

        filesResponse.data.resources.forEach(function(file, index) {
          console.log(file);
            // Check whether the file is one of these filetypes; Want to add more? Add to the array
            if (['mp4','mov','m4v'].indexOf(file.file.ext.toLowerCase()) > -1) {

                    $fileList.append(
                        '<video width="320" height="240" controls>'+
                               '<source src="'+
                               baseURL + '/app/file/resource/' + file.file.uuid+

                               '" type="video/'+file.file.ext.toLowerCase()+'">'+
                               'Your browser does not support the video tag.'+
                        '</video>'
                   );
            }
        });
    });
</script>
SIMS Cover list
Something a lot of our schools ask for is the ability to present the cover pages generated by SIMS. Using the File Drop widget and the code below, this can be achieved as well.
SIMS generates menu pages, as you can see from this example, we haven't included those. Files uploaded to Frog have their filenames altered - to prevent users overwriting other files of the same name. As a result, any hard coded menus won't work, but using the File Drop, each individual page can be displayed at least.
<div id="coverpage"></div>

<script type="text/javascript">

var baseURL = Frog.Utilities.getBaseUrl(),
    myCoverArray=[],
    // Change fileDropUuid to the UUID of your file drop widget
    fileDropUuid = 'BF6DD930200280DA4017FF1E53A2210D7607BA4C89189C5F';
Frog.Model
    .api('filedrop.get', {
        filedrop: fileDropUuid
    }).done(function(filesResponse) {
        var $fileList = $('#coverpage');
        filesResponse.data.resources.forEach(function(file, index) {
            // Check whether the file is one of these filetypes; Want to add more? Add to the array
            if (['html','htm'].indexOf(file.file.ext.toLowerCase()) > -1) {
                    myCoverArray[index]=[file.file.name,'/app/file/resource/' + file.file.uuid + '.' + file.file.ext];
            }

        });
        myCoverArray.sort();
        for (var i = 0; i < myCoverArray.length; i++) {
            //console.log(myCoverArray[i][0]);
            $fileList.append(
                      '<iframe width="800" height="600" style="margin-left:auto; margin-right:auto;" src="'+
                      baseURL + myCoverArray[i][1] +
                      '"></iframe>'
                    );
        }
    });
</script>
Tutorials in this series...