


Take a look at what's in the latest Frog Release - Discover Hopper
An introduction
This tutorial uses Frog's Internal APIs. These are subject to change by our developers. Frog does provide external, fixed APIs, known as the FDP APIs. Documentation for these APIs is available to install via Package Manager.
An API (Application Programming Interface) can be thought of as a function used to return information. For our needs, the information returned generally contains mutliple elements of organised information, we need to identify and extract individual elements of this information.
FrogLearn's appearance, sites, file handling (in fact everything) is determined by calling the FrogOS APIs.
Over the years, Frog have tried to protect schools from the changing nature of these APIs, but what we haven't done is show you how to use them in their current form.
If you haven't viewed the earlier tutorial Hello World, Hello Me, it might be worth working through that one first.
Outcomes
By the end of this tutorial, you should be able to:
- Understand how to find a Frog API
- Use the HTML widget and console log to retrieve information from an API
- Build a table listing all current assignments for a student
Finding an API
We're going to jump right in with a demonstrate, then we'll go over what we've done.
Step 1
Open the Developer Tools in your browser
Google Chrome, it's currently either:
- Menu > More tools > Developer Tools
- Hold CTRL + SHIFT + I
Internet Explorer:
- Menu > F12 Developer Tools
- Tap F12
Click on the Console tab for either browser. You'll probably see a page full of returned data.
At this point, the easiest option is to clear it using the clear symbols (in Chrome it currently looks like a no entry sign and in IE, it's a cross).
Click on the Network tab - this is where the APIs will appear, when they are called.
You'll be clearing both the Console and Network sections quite a few times during the next few steps.
Step 2
Open FrogDrive and navigate to the Documents section.
Clear the information out of the Network (it wouldn't hurt to clear the console as well)
Step 3
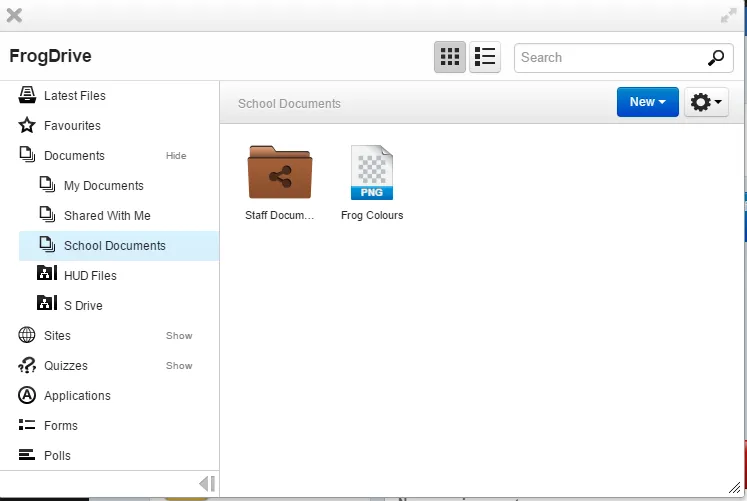
Click on the School Documents folder. This assumes you have some files in School Documents. If not, you'll need to upload some and try again.
Hopefully, your folder will look something like this:
Step 4
Take a look at the Network tab

That's the API being called to display the folder contents. It's called resources.getOfType
If you click on the text, you'll see it's a link which opens a preview of the parameters sent and the data received back.

If you twirl down / expand the data section, you'll see a resources section, which lists out each file by its UUID - each UUID section contains information about the files, such as their external url and the original filename
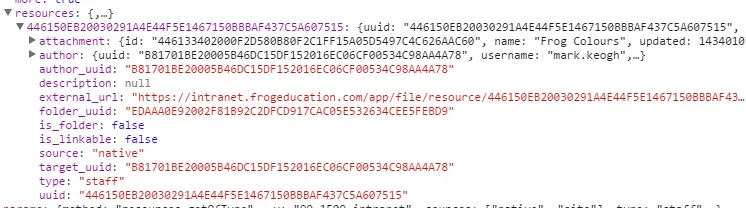
The folders section lists out any folders contained within the folder.
Calling an API
Now that we've used the Developer Tools to see the data in an API, we now need to access it using an HTML widget.
The method outlined below is quite simplistic, but I think it's a good method of understanding what's going on
Step 1
In Developer Tools > Network, right-click on the API and choose Copy link address and paste the copied link into the code editor of your choice.
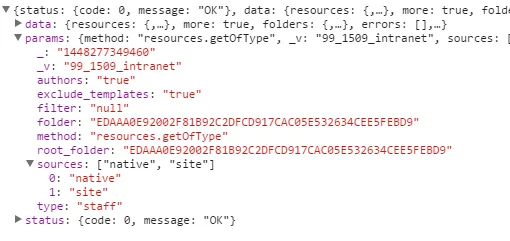
https://yourschoolfrogurl/api/2/?method=resources.getOfType&_v=99_1509_intranet&sources%5B%5D=native&sources%5B%5D=site&type=staff&authors=true&root_folder=EDAAA0E92002F81B92C2DFCD917CAC05E532634CEE5FEBD9&folder=EDAAA0E92002F81B92C2DFCD917CAC05E532634CEE5FEBD9&filter=null&exclude_templates=true&_=1448277349460
Highlighted in red are the variable names passed to the API to retrieve the relevant information.
This same information is in the params section of the preview:
Step 2
Copy the following code into an HTML widget:
<ul id="folderlist"></ul>

<script>

var folderlist = $("#folderlist");

Frog.Model
    .api('resources.getOfType', {
        sources: ["native","site"],
        type: 'staff',
        author: 'true',
        root_folder: 'EDAAA0E92002F81B92C2DFCD917CAC05E532634CEE5FEBD9',
        folder: '03AA241E2002FF01BF4D6F965B84CD09F0C5D4AC9DD49FD3',
        filter: null,
        exclude_templates: 'true'
    }).done(function(listResponse) {
        //console.log(listResponse.data.resources);
        var files = listResponse.data.resources;
        console.log(files);
        $.each(files, function(index,file) {
            console.log(file.external_url);
            console.log(file);
            folderlist
                .append($('<li></li>').text(file.external_url)
                );
        }
    );

});
</script>
- The top line of code <ul id="folderlist"></ul> creating an unordered list in HTML. We've given it the ID of folderlist, to make it easy to attach things to later.
- We're creating a call using Frog.Model.api('resources.getOfType', note that our API is named here.
- In the { }, we list out the parameters required, in this case:
- sources
- type
- author
- root_folder
- folder
- filter
- exclude_templates
The UUID's of the root_folder and folder are unique to the folder we're looking at. Often with APIs, you can remove or alter some parameters if you're only after specific information.
- We then run a function once the API is done (called and returned) and we create an object for the data returned, called listReponse - }).done(function(listResponse) {
- Inside this function, we create a variable called files, which is an object containing all the infomation in the resources section of the API's returned data var files = listResponse.data.resources;
- We want to take a look at files in the console. console.log(files);
- Now, we run through each resource, listing the external url as a list item and attaching them to the UL called folderlist:
$.each(files, function(index,file) {
console.log(file.external_url);
console.log(file);
folderlist
.append($('<li></li>').text(file.external_url)
);
}
When you save and close the page editor, you should see a range of information returned in the console log and a set of bullet points for each file's external address.
Getting a list of assignments for a student
In the previous pages, you've seen how it's possible to use the Developer Tools to determine an API and get usable information back.
Let's look at another example. With the Newton update, this example is probably not that useful, but still demonstrates what can be achieved using Frog's APIs
Step 1
Identify a student account you can log into. If the student doesn't have any work assigned to them, make a couple of assignments for them. Add some text into the instructions panel.
Quick tip: Using In Private Browsing / Incognito mode, you can log into Frog twice. Once as yourself and once as a student. You can then switch between views without having to log in and log out all the time.
Step 2
Switch to your student login, open Developer Tools and clear the Network panel
Step 3
Open the Assignments app.
The Network panel will display the various elements and APIs drawn into the browser
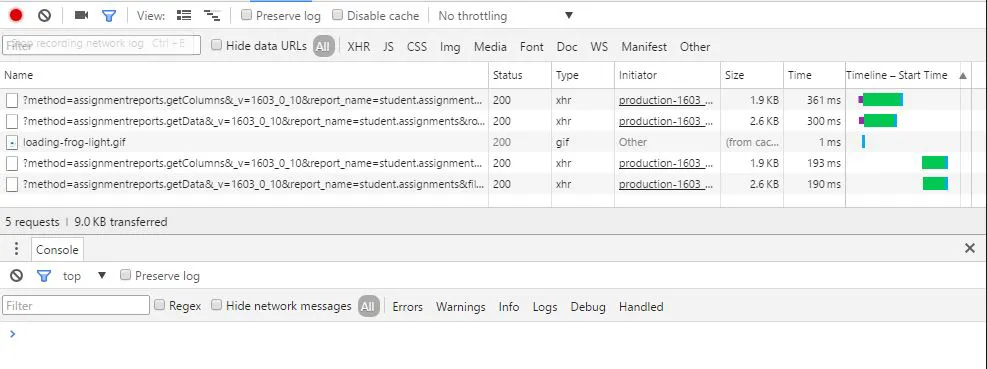
Looking at the screenshot from my panel, there are two API calls (they are repeated, but I'm looking at "assignmentreports.getColumns" and "assignmentreports.getData".
Just going by the names, I think it's likely that assignmentreports.getData contains the data I'm after.
Clicking on the API brings up the preview pane and explore the data section shows that this is indeed what we're after.
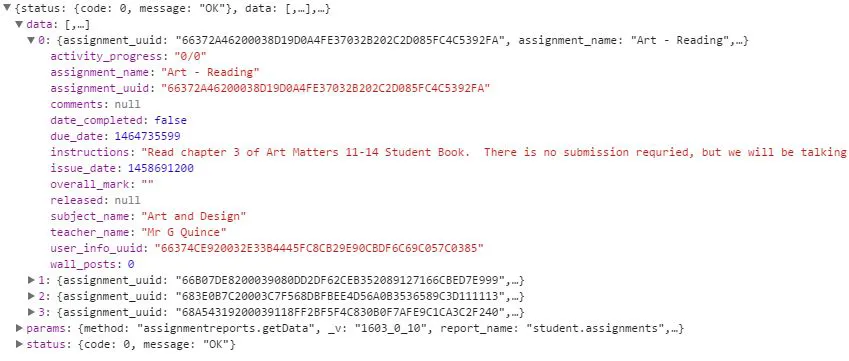
This API contains a wealth of information about each assignment, but what I'm interested in is the following:
- Assignment name = assignment_name
- Subject = subjecT_name
- Due date = due_date (recorded in Unix time)
- Instructions = instructions
More information can be pulled back, but then we're starting to reinvent the assignments app.
Step 4
In an HTML widget, create a table with a set of headings
<script>
var $assignmentsList, user;

// Create a div, and give it is unqiue ID
$assignmentsList = $("<div>", {
        id: Frog.Utilities.generateSimpleId()
    }
);

// Add a table to the div
$assignmentsList.html(
    '<b>Your open assignments:</b>'+
    '<table class="table" id="your_assignments">'+
        '<tr>'+
            '<th>Subject</th>'+
            '<th>Title</th>'+
            '<th>Due Date</th>'+
            '<th>Instructions</th>'+
        '</tr>'+
    '</table>'
);

// Use Frog's API to get the logged in student
user = FrogOS.getUser();

// Use Frog's assignmentreports.getData to get 15 assignments for the logged in student.
Frog.Model
    .api('assignmentreports.getData', {
        filter: { status: "open" },
        limit: 15,
        offset: 0,
        options: { child_uuid: user.uuid },
        report_name: "student.assignments"
    }).done(function(assignmentResponse) {

        // Loop through all the responses
        assignmentResponse.data.forEach(function(work) {

            // Use monment.js to convert the due date timestamp to a human-readable format
            var dueDate = moment.unix(work.due_date).format("DD/MM/YY");

            // Find the table in the DIV created above and add in the various fields from the API's response as a  new row
            $assignmentsList.find('tbody')
                .append(
                    '<tr>'+
                         '<td>'+
                         work.subject_name+
                         '</td><td><b>'+
                         work.assignment_name+
                         '</b></td><td>'+
                         work.instructions+
                         '</td><td>'+
                         dueDate+
                         '</td>'+
                    '</tr>'
                );
        }
    );
});


arguments[0].append($assignmentsList);
</script>
What's going on:
- We created two variables, $assignmentsList and user
- $assignmentsList will become our assignment table
- user will be how we identify our user
- On lines 5 -8, we create a DIV for our $assignmentList and give it a unique ID using Frog.Utilities.generateSimpleId() - a handy Frog utility which means this script can run on several sites without interfering with each other
- Lines 11-21, we use HTML to set out our table with headings
- Line 24 uses FrogOS.getUser() to bring back information about the logged in user. You can read more about this API in the Hello World, Hello Me tutorial
- Lines 27-33 calls the assignmentreports.getData API and passes through the parameters we noted from the Console
- Line 32 contains user.uuid This is the UUID (unique Frog identifier) for the user variable we populated on line 24
- Line 32 contains user.uuid This is the UUID (unique Frog identifier) for the user variable we populated on line 24
- Line 34 runs a function when our script receives data from the API call.
- We've named the data returned from the API as assignmentResponse, which contains an 'entry' named data - this section contains entries per assignment, so we need to loop through these using forEach
- We added inside the function the parameter work - this is a useful short hand for each entry inside assignmentResponse.data
- Line 40 we create a new variable called dueDate and use moment.js to transform our due_date (work.due_date) data into human-readable form
- Line 43- 56 seaches for the tbody section of our $assignmentsList table (automatically created after a table header row) and adds in a new row containing the information we're after:
- work.subject_name
- work.assignment_name
- work.instructions
- dueDate
- Line 62 uses arguments[0] to identify the HTML widget our code is running in and adds our $assignmentList DIV to it
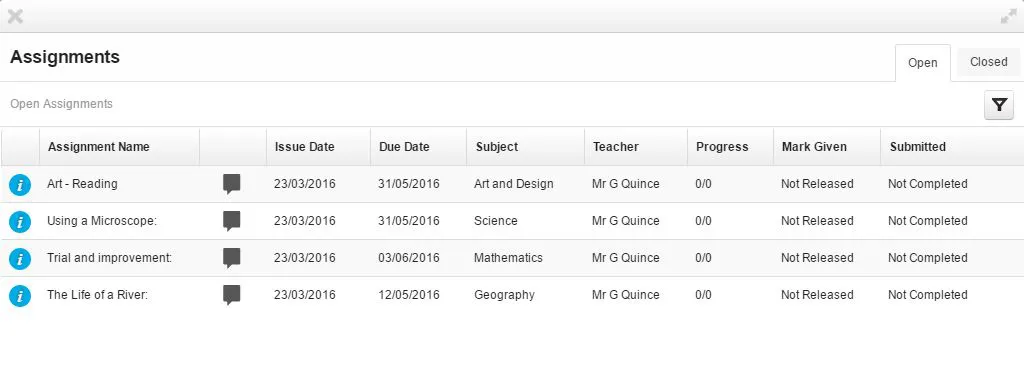
When you view this code in a site as your student, you should see something similar to the following:

Summary
Using APIs in the fashion described in this tutorial can sometimes feel as much about art as science. It is very important to understand that APIs can change. These are not our published Frog Developer Platform (FDP) APIs. You may find that a new update replaces the existing APIs or radically changes the information they supply.
We are working on creating a definitive list of FDP APIs and their document. There is a separate website to support the FDP - http://fdp.frogcommunity.com/
Frog's developers monitor the forum attached to that website and do their best to respond in a timely fashion - workload dependent.
Hopefully, you can now see how to access the APIs and this should leave you in a better position to adapt to changes warned about above as well as build your own features in Frog.
Rather than posting an extension activity for this tutorial, I'd rather encourage you to visit Frog's forums - where our community has proven themselves more than capable of answering any questions. Frog staff also monitor these forums and there's some healthy competition to be the first to solve a poster's issue.
Tutorials in this series...